How to Optimally Configure Magewell Ultra Stream Encoders for High-Quality Streaming
Magewell's Ultra Stream encoders make live streaming remarkably simple even for non-professional users, enabling them to stream or record high-quality video with one click. Small in size yet powerful in function, they cost-effectively enable houses of worship, educators, government agencies, corporations, gamers, and other users to reach wider audiences of followers, students, constituents, customers and fans through streaming.
While Ultra Stream encoders themselves are robust and dependable, their ability to stream reliably depends on configuring their streaming settings optimally for your network environment and internet connection. It is important to note that the connectivity packages offered by internet service providers may have very different download and upload speeds. For example, a package that offers 50Mbps download speed may only offer 5Mbps upload speed. If you the bitrate you try to stream exceeds the upload capacity of your network connection, the stream will be unstable, with issues ranging from dropped frames and frozen video to a complete inability for your viewers to connect.
This blog provides tips for configuring Ultra Stream encoders for optimal streaming in your network environment. Users can control Ultra Stream encoders using on-device buttons, a browser-based web interface or an intuitive smartphone app. Settings can be configured using either of the latter two methods, and since the management pages are very similar in the web UI and the app, we will use the web UI in these examples.
1. Choose your network connection mode and test your connection to the server
Ultra Stream encoders provide built-in functionality to test the connectivity to your target streaming server or service. These features test whether streaming is successful and whether the upload speed (that is, bit rate) is stable.
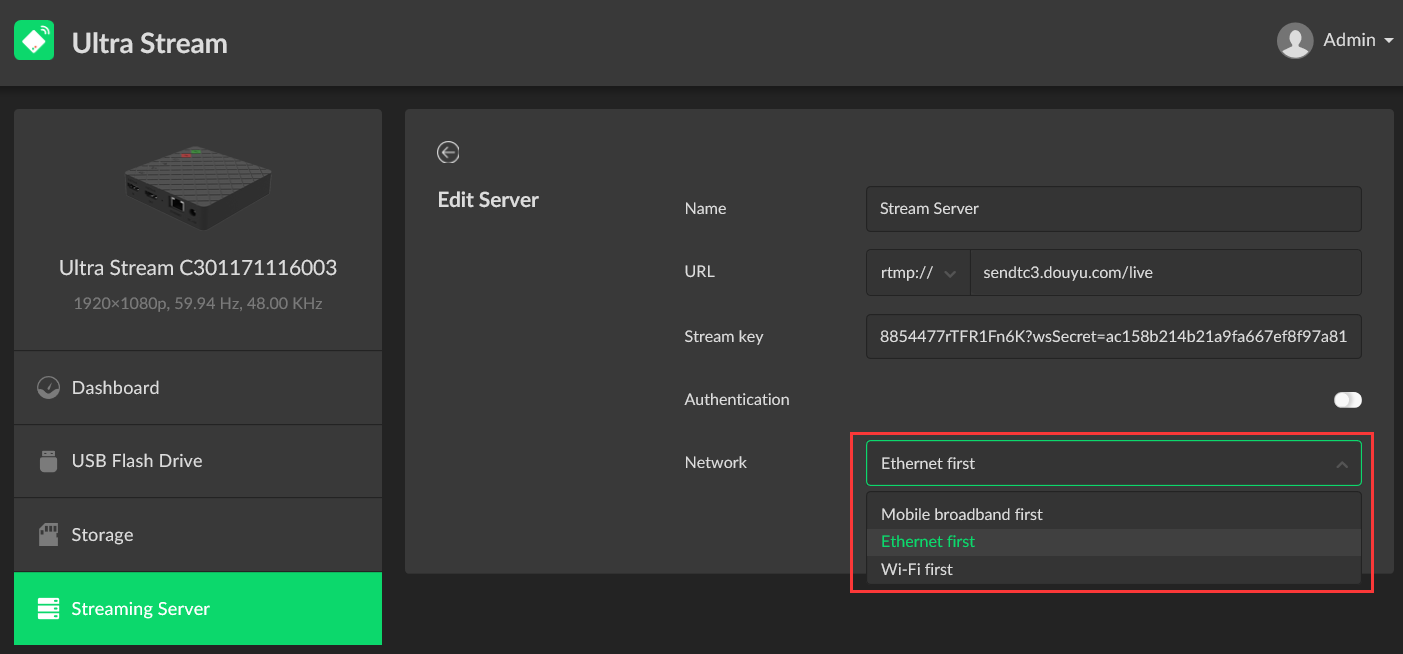
You must also configure whether you will be connecting the Ultra Stream unit to your local network via wired Ethernet or Wi-Fi. Wired Ethernet provides more consistent performance, so is recommended whenever possible; if you must use Wi-Fi, please see section 3 for additional Wi-Fi-related considerations. For this example, we will use wired Ethernet connectivity.
Log in to the web UI of the Ultra Stream unit, and click "Streaming Server" in the menu on the left. Tap the "Add Server" button, then select RTMP. Enter the URL and Stream Key of your target destination. In the drop-down list, select "Ethernet first" (for a wired connection) or your preferred network connection type.
Now click "Test". Ultra Stream will determine whether the test streaming is successful by detecting whether there is a large fluctuation of the upload speed (bit rate).
During these tests, make a note of the range of upload speeds. This upload speed should be used as a reference for configuring your encoding settings (see section 2).

If the network status can support the streaming bit rate, it will show that you are successful.

2. Select appropriate streaming bit rates
Ultra Stream encoders can support two distinct sets of encoding parameters for simultaneous streaming and recording – the "Main Stream" and "Sub Stream". The "Main Stream" is the one you will typically use for your highest-quality stream. To ensure stable, high-quality streaming, you should configure the appropriate streaming resolution, frame rate and bit rate based on your network environment. In this example, we focus on the “Main Stream”.
Click "Encoding Parameters" in web UI's left-side menu, and go to the "Main Stream" section. Under "Output", you can change the encoding resolution, frame rate, and bit rate of the stream.
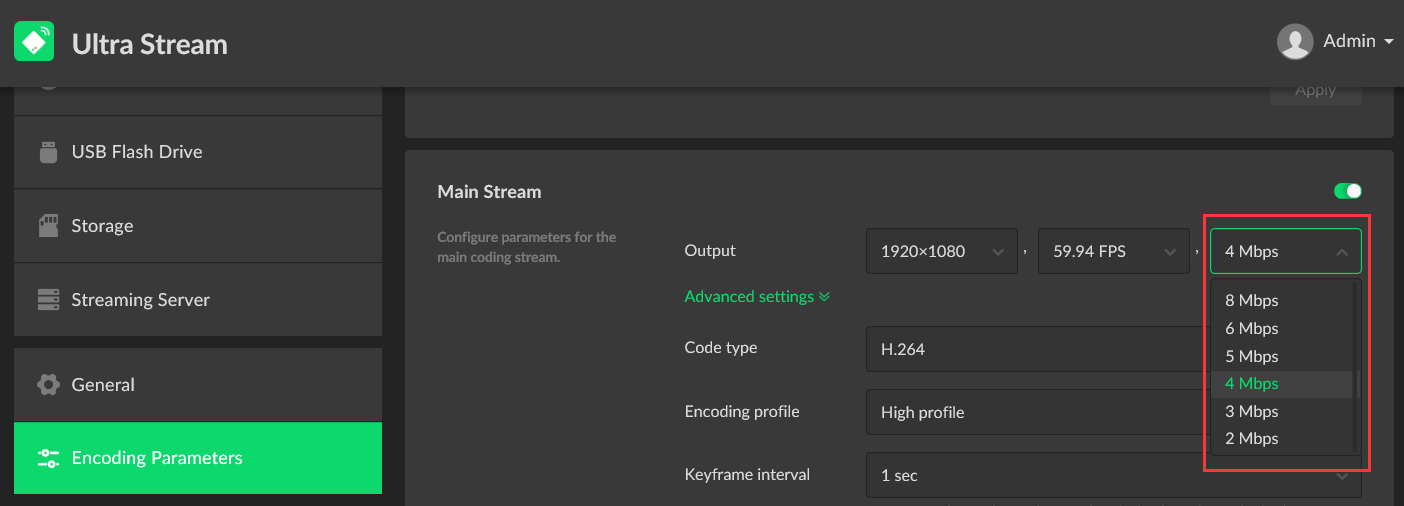
Most importantly, set your Output bit rate based on the capabilities of your network connection and the upload speeds that you saw in your tests in section 1 of this article. For example, in the earlier screen shot, the upload speed was just over 5 Mbps; in that case, you would want to choose an encoding bit rate no greater than 5 Mbps (possibly even 4 Mbps to be “safe”). Choosing a bit rate greater than the upload speed will result in stream instability.
Next, choose your encoding resolution and frame rate to maximize quality for your chosen bit rate. Note that if you choose too high a resolution and frame rate for your target bit rate, the stream may be stable and reliable, but your video quality will suffer because the encoder must compress that high resolution into such a low bandwidth.
Your chosen streaming server or service likely will publish recommendations for combinations of resolution, frame rate and bit rate. YouTube, for example, recommends (“Choose live encoder settings, bitrates, and resolutions”, YouTube Help, as of February 24, 2021) a bit rate between 4.5 Mbps and 9.0 Mbps for 1920x1080 resolution at 60 frames per second, or between 3.0 Mbps and 6.0 Mbps for 1920x1080 resolution at 30 fps. Note that while 60 fps is idea for content with fast motion like sports, 30fps is often perfectly adequate for streams of lower-motion events such as worship sermons and can more comfortably fit lower internet bandwidths.
In extreme cases, such as if your upload speed is below 2.0 Mbps, you can also lower the resolution. For example, YouTube's recommendation for 1280x720 video at 30 fps accommodates bit rates as low as 1.5 Mbps. But if you want to maximize your stream quality by offering 1920x1080 video and your bandwidth is too low to support it, you will need to upgrade your internet connection.
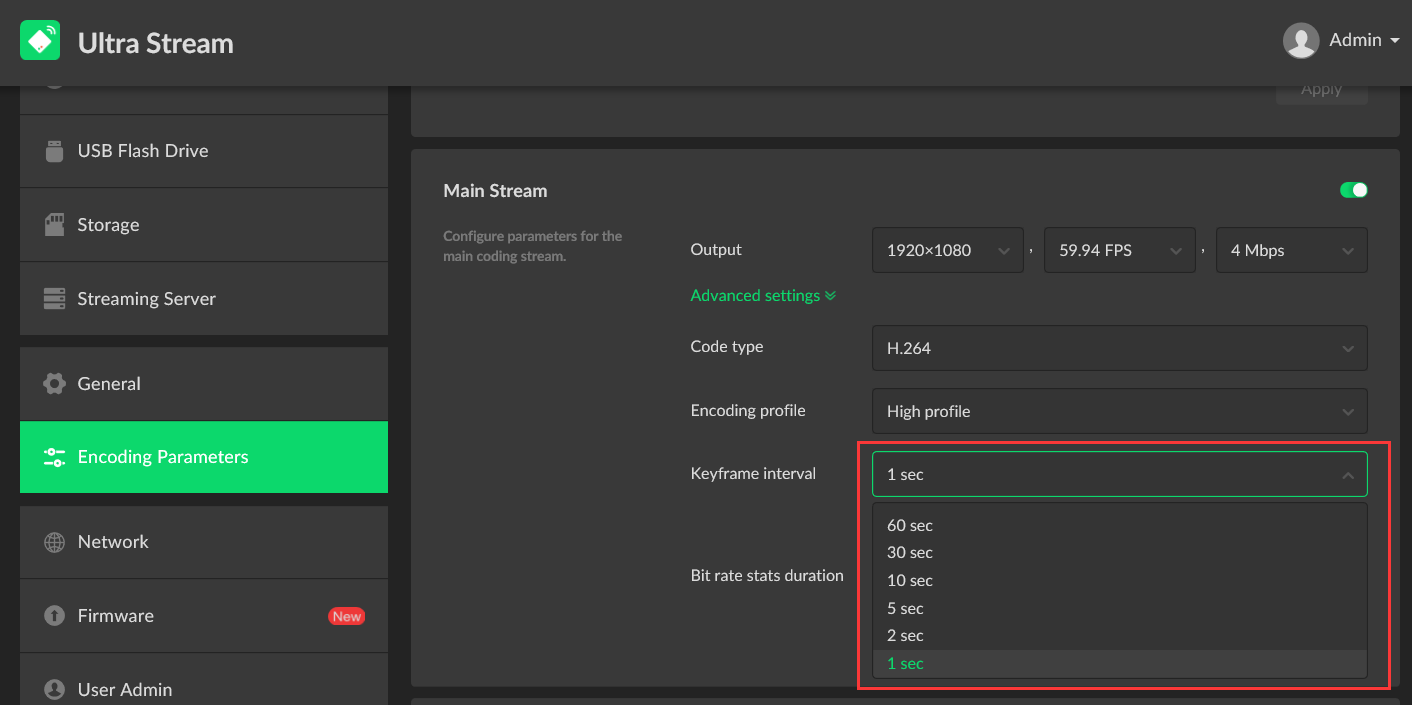
You can also configure the "Keyframe interval" in this screen. To ensure smooth live streaming, it is recommended to select 1 second or 2 seconds as the keyframe interval. Higher values may slightly reduce bandwidth requirements but may result in lower video quality, particularly in terms of motion.
3. Select an appropriate wireless network channel (Wi-Fi)
If you are connecting to your local network (and thus the internet) via Wi-Fi rather than wired Ethernet, the stability and performance of your Wi-Fi connection will also have an impact on the reliability of your streams. If there are multiple wireless routers nearby using the same or overlapping Wi-Fi channels, interference between them can affect the quality of the Wi-Fi link and significantly degrade its performance.
Note that even if your router is not using exactly the same Wi-Fi channel as another router, there can still be interference because Wi-Fi channels overlap. For example, as you can see in this diagram, Wi-Fi channel 2 overlaps with Wi-Fi channel 1 (as well as 3, 4, and 5):
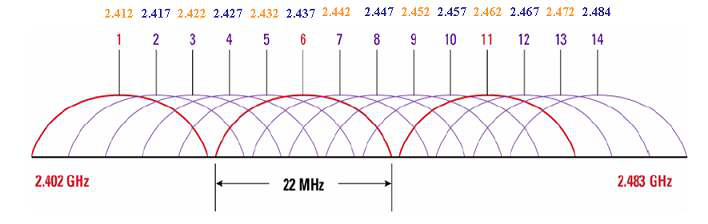
The Wi-Fi channel can be configured in your wireless router. To minimize interference, you should choose non-overlapping channels for different wireless routers (for example, where possible, choosing 1, 6, and 11).
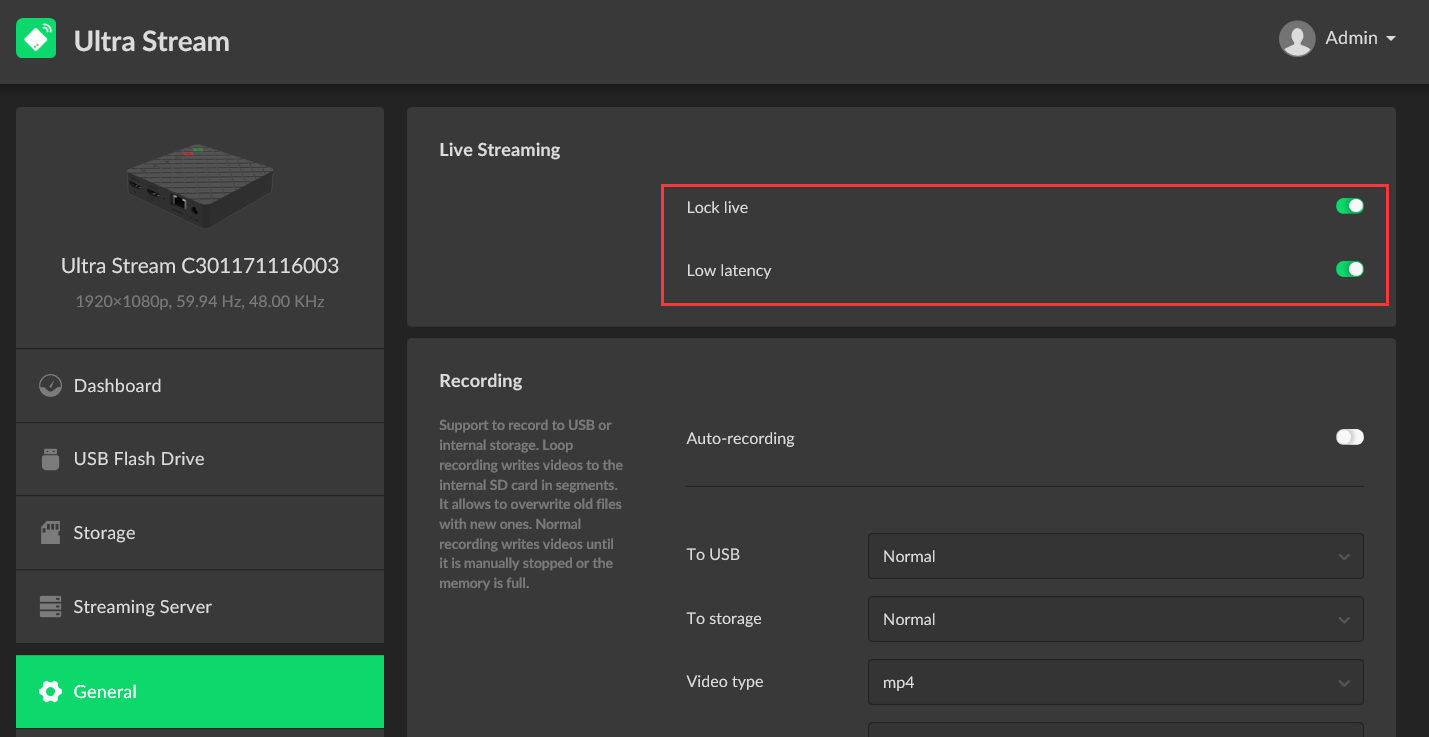
4. Use "Lock Live" mode to prevent accidental interruptions
Once all of your streaming settings are appropriately configured, there is also another setting you can use each time you stream to bolster your reliability. The Lock Live feature lets you prevent live streaming from accidentally being interrupted by users inadvertently pressing buttons on the unit, in the app, or in the web interface.
This feature can be found in the “General” tab of the Ultra Stream web interface. When you turn on the "Lock Live" switch, the device will automatically start streaming. Once this function is activated, if you want to stop streaming, you will first need to turn off the Lock Live switch in the web interface. You can then return to the Dashboard to manually stop streaming.